
|
 |
| Putting on the Style | |
What is a style in Microsoft Word? Very simply, it is a way of collecting a number of effects together under a single heading. As an example, let’s say that every subheading in your document was going to use the Arial font at size 14pt, coloured red, right aligned on the page with a large gap before it and a small gap after it. Now apply this to the twenty or so subheadings in your document – that makes about 120 mouse selections! Then you change your mind and decide that the subheadings should be blue and left aligned – a further 40 or so mouse clicks. Wouldn’t it be easier if you could set something up called My Subheadings? Then you just highlight your text and select My Subheadings from the style selector. Now when you change your mind, make the changes in the style editor and every piece of text in your document which has had that style applied takes on the new appearance. The benefits should be apparent; moreover you can take any styles from one document and use them in another, which means that you can have a coherent style across similar documents. |
|
| What styles do I need? | |
| In the main, you would probably need to set up styles for Body Text (the main blocks of text), Main Headings and Subheadings. Depending on the kind of document you are producing, you may also need styles for Bullet Points, Tables and Captions for images. To create a style, follow these steps: Select Format from the menu bar then Style… to display the Style dialogue box Select the New… button and enter a name for your first body text style; call it something like Formal Body or My Body Text. Now you need to set the parameters for the style. Select the Format button to display a list of parameters that can be set for your style. The most common parameters are those for Font and Paragraph, and a variety of choices for numbering and lists. As this is a body text style, you will need to decide how it will appear on the page, so that it is easy to read and that it is obvious where paragraphs start and end. The following is a list of suggestions you should follow when setting up the Font and Paragraph parameters: The following is a list of suggestions you should follow when setting up the Font and Paragraph parameters:
|
|
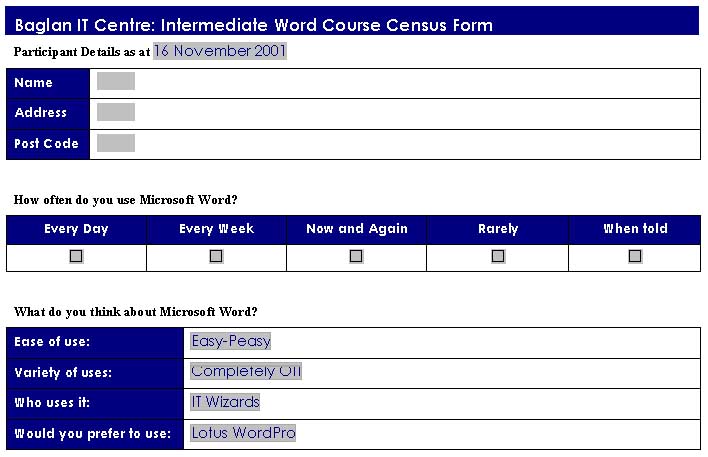
| Remember the Threshold Form? | |
For those of you who have had the wonderful experience of filling in the electronic version of the Threshold Form, you may be wondering how it was done. For those of you who haven’t, it was a Word document that only allowed you to enter information in certain places, other areas being locked. The form also prevented you from changing any parameters, such as font, font size, font colour etc. which led to more than a little consternation and frustration. On the other
hand, forms could actually be useful in the curriculum, allowing pupils
to take computer-based tests, fill in school census forms, create data
collection sheets and so on. Here is an example of a simple form: |
|
 |
|
| Creating a Form | |
| The first steps in creating a form is to display the Forms toolbar; select View>Toolbars>Forms. This toolbar will allow you to create Text Fields, Check Boxes and Drop-down lists. The form above uses tables to align the information and, although not essential, does make laying out the form a relatively painless procedure. Enter any preparatory text for the form before using the Insert Table tool from the Forms toolbar to create a 3x2 table on the document. Enter any textual items in the first column (Name, Address and Post Code in this example) before clicking in the cell at the top of the second column. Select the Text Form Field button from the Forms toolbar, and then double-click the grey rectangle which appears in the table’s cell. The dialogue box will enable you to set a range of parameters such as the type of information to be entered (text, date, number), how much information can be entered, the format of the information entered as well as help text. Now enter and format the other Text Form Fields. For the Check Box section, create another table from the Forms toolbar (this one is 2x5) and enter the column headings. Select the cell in column 1, row 2, then select the Check Box Form Field button from the Forms toolbar. Double-click the grey square which appears in the cell to display the check box properties. For ease of use, set the size to Automatic and then decide whether it is to be checked or un-checked. Now create the other four check boxes. To create the drop-down list section, create another table which has 4x2 cells and enter the information down column 1. Select the cell at the top of column 2, and then select the Drop-Down Form Field button from the Forms toolbar. Double-click the grey box which appears in the cell to display the properties. Enter the first list item and select Add>>, enter the next item and select Add>>; keep going until your list is complete. You can change the order of items via the Move arrows and remove items by using the Remove button. Finally, you need to lock the document so that everything except the form items is protected from change. To do this quickly, select the Padlock button on the Forms toolbar so that you can check that your Form works as it should. To protect the document permanently, select Tools>Protect Document… and then choose Forms from the dialogue box. If necessary, you can protect it with a password . Your form is now ready for distribution.
|
|
| Footnotes | |
If you look closely at the paragraph above, you will see that a footnote has been added. When printed, the footnote appears at the bottom of the page containing the reference (as you would expect). When viewing the document on-screen, placing the mouse pointer over the footnote reference will display a pop-up box containing the footnote details. To create a footnote, place the text cursor where you want the reference to appear, either by clicking with the mouse or using the cursor arrow keys. Select Insert>Footnote to display a dialogue box in Which you can specify the type of reference, usually by number, letter or Roman numeral. When you click OK, the text cursor appears at the foot of the page you are currently working on, so that you can enter the footnote information. The reference (number, letter etc.) automatically appears at the beginning of the footnote. You can change the font or apply styles as normal. If you decide that your footnote reference is in the wrong position, the only way to move it is to drag it to a new position with the mouse. |
|
| Columns – Newspaper Style Layouts | |
| Strictly speaking, Word is not a DeskTop Publishing (DTP) application. This kind of task is much better suited to programs which have been created specifically for DTP work, such as Publisher, Quark, Ovation Pro etc. Having said that, it is possible to make Word use columns in newspaper fashion, automatically flowing text from one column to the next on the same, or even different pages. It must be said, however, that if possible, always use a proper DTP package to do DTP style work. The following is an example of how this might appear in Word. | |
 |
|
| Setting up Columns in Word (1) | |
Although this may sound contrary to what you might expect, it is easier to enter all the text for the area you want to turn into columns first. This will give you more control over the layout of your column section. It is necessary that your document is displayed in Print Layout View (from the View menu). In the example above, the heading was created first, then the story was entered in full before saving the document (just in case the next bit goes wrong!). It is important to highlight the text which is to be converted into column format before proceeding to the next step. Select the Columns button from the standard toolbar and choose 1, 2, 3 or 4 columns by moving your mouse pointer over the choices and selecting your choice. You should now see your selected text split across the number of columns you chose. Continue to add text and you will see that the columns automatically adjust themselves to accommodate the new information. To change the look and layout of your columns, select Format>Columns… from the menu bar. This enables you to set the width of each column, the spacing between columns, whether or not to include column lines and so on. For more information about setting up columns in Word, press the F1 function key and search for help on newspaper. |
|
| Setting up Columns in Word (2) | |
| If you find that setting up columns as outlined above is a bit cumbersome, there is another method available through the use of Text Boxes. With Text Boxes, you can control the flow of information from any box to any other, as well as position them exactly on the page (as in a frame-based DTP package). Having said that, it is more difficult to get lines of text to align exactly between adjacent boxes – something that proper columns allow automatically. Here is how the previous example appears by using three Text Boxes: | |
 |
|
| Method: Although the above looks similar, there are a number of subtle differences. Each of the three boxes has been set not to have borders, a border set to the right of the text in box 1 and the left of the text in box 3. The picture is not in box 2, it is sitting on the page behind the text box, whilst the fill colour of the text box has been set to none. Finally, the three text boxes were selected and grouped together so that they could be moved around the page as a single unit. I don’t recommend this as a quick way of setting up columns! | |
| Setting up Columns in Word (3) | |
| This is the cheat’s method! Just create a table on the page with 3 columns and as many rows as you need. It is possible to merge cells in a table so that the layout can vary down the table. With judicious use of borders it is possible to make it look like newspaper columns. You should choose the method which suits your purpose, although I would again stress that DTP is easier in a DTP package – not Word!
|
|
| Importing Objects into Word | |
Word allows a wide variety of non-textual items to be inserted into a document. Already you will have inserted images and drawing objects into a document and set their properties, for example dimensions, colours and how they behave when placed next to text. These objects are embedded into the document, that is, when you save the document, the objects become saved as part of the file. When you insert other objects into Word, for example sounds, movies and other non-native files (spreadsheets etc), then you need to make the choice as to whether they are embedded or linked. A linked object has a major advantage over an embedded object – if a linked object is changed or altered in any way, those changes are reflected in the Word document. |
|
| Embedding Sounds and Music into a Word Document | |
| Inserting sounds is quite straightforward, so long as you have a few examples ready. Short sounds tend to be in a format called waveform (e.g. sound.wav) whilst there exists large numbers of longer musical examples in mp3 format. Another common format for musical examples is the MIDI file (e.g. music.mid); these have the benefit of taking up very little memory but the disadvantage of only sounding as good as your sound card. Let’s assume that you have some sound/music files on your computer and you want to include an example in your Word document. Position the text cursor where the icon (a click-able symbol) will appear and select Insert>Object… from the menu toolbar. Under the Create New tab, scroll down the list of available object types, select the file type you want to insert (Wave Sound or MIDI Sequence) and select OK. Depending on what you selected, an icon representing the sound will appear in the document and also a program or application which can handle that kind of object will open on the screen. Use the application to open/find/create the sound/music you want and then return to your Word document by clicking anywhere in the text. One confusing feature about all of this is that the Word toolbar will change to reflect whatever type of file you are embedding. Opposite, you will see one frame from a short movie file which was inserted into the document. During the process, the toolbar changed to include tools suitable for (basic) editing and reviewing of the movie: A similar toolbar change will occur if you decide to insert a bitmap image or other paint/draw object. You will suddenly find that your Word toolbar has taken on painting or drawing tools, allowing you to create images or drawings directly onto the Word document. Don’t forget to click the mouse on the text to return to entering information.
|
|
| Linking to information | |
| Rather than embed the information into the document as outlined above, you may wish to create links to other information which can be displayed in the Word document. This has uses such as being able to display information from, for example, several spreadsheets on the same page with the advantage of changes to the spreadsheets automatically being updated on the page. A disadvantage is that should one or more of the linked documents be deleted or moved to a different location, Word will no longer be able to display that information. The example on the following page shows sections from two spreadsheets which have been linked to. (Note that the Link to File choice has been selected in Insert>Object…) The images here show links to two spreadsheet files. To edit any of the spreadsheets, double-click the image to open the file in Excel (or whatever application the file belongs to). Any changes made to the file will be reflected in the image. Note that only the areas of the spreadsheets which contain data are shown in the image. Be aware that should the original files change size, in this case more cells have data, then the image will change size. This would mean that it would be necessary to reformat the document to take account of the increase in image size. You can change
the size of these images in exactly the same way as if they were pictures
inserted in the normal manner. Just select an image and use Format>Object…
from the menu bar to set the size and how text is wrapped next to the
image.
|
|
| Mail Merging | |
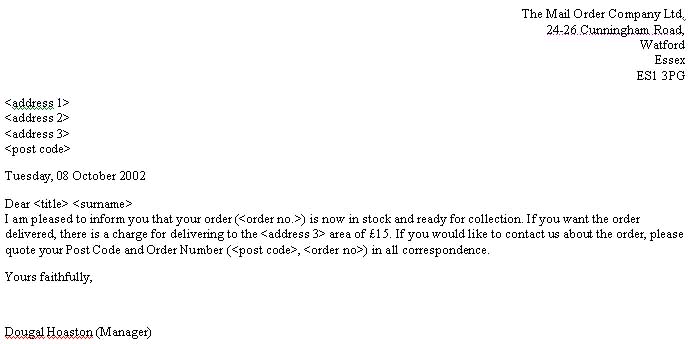
| The ability to create multiple copies of a document which contain variable elements is a powerful feature of Word. The most obvious use of this feature is Mail Merging, where variables such as names, addresses and salutations etc, can be taken from a list and automatically entered into selected areas of a document. To be able to mail merge, it is important to have a list of items which can be merged into the document. The list could already exist in a database or spreadsheet, or Word can give you the option of creating a list from scratch, using a preset range of fields (headings). The disadvantage of creating the list in Word itself is that you cannot change the headings provided (which tend to be Americanised and business orientated). By far the easiest method of creating a list to be merged into Word is via the Excel spreadsheet. The first row of the spreadsheet will be assumed to be headings, with each column designated as a field. Open Excel and enter the information below (you can make up your own information if you like): Note that you don’t have to format the Excel document. Save the Excel file and close the program. In your Word document, you are going to create a formal, business letter which will be sent to all the people in the list, telling them that their order is ready for collection. When you write the letter, you may find it worthwhile putting placeholders where data from the list will appear, e.g. Dear <Title> <Surname> and so on. When you have finished the letter, save the document with a name which reflects what the document is, e.g. mergeletter1. Your letter may look something like this (complete with fake company name and address etc.): |
|
 |
|
| You are now ready to merge the data from the spreadsheet into the letter. In the Tools menu, select Mail Merge… to display the merge dialogue box. Select the Create button and choose Form Letters and Current Document from the choices. Select the Get Data button and choose Open Data Source…; you need to browse to where your Excel spreadsheet file has been saved and open it (remember to set the Files of type to Excel files in the browser window or the file won’t be listed). If there are named areas in the spreadsheet (which there should not be with this example) you will be asked to choose between the areas or the entire spreadsheet – choose entire spreadsheet for this example. Word will then complain about there not being any merge fields in this document (as you haven’t set any yet) so choose Edit Main Document to proceed to the next step. At this point you should look closely at the toolbar at the top of the screen; you will find an extra set of tools to help you carry out the mail merge. To enter the data into the document, highlight you first placeholder (<address 1>), select the Insert Merge Field button and select the corresponding field (Address_1). The merge field will appear in your document as «Address_1». Now do the same for the other placeholders until you have entered all of the merge fields. In the merge toolbar, select the View Merged Data button to check that the information is correctly entered. You can move through the records by selecting the red arrows. When you are satisfied that everything is working correctly, select the Merge… button and choose Merge to New Document for a paper record of each letter or Printer to immediately print out each letter. You can still format the document at any point (change font, font size, colour etc.) even before you begin the merge. This ensures that each copy of the letter is identical.
|
|
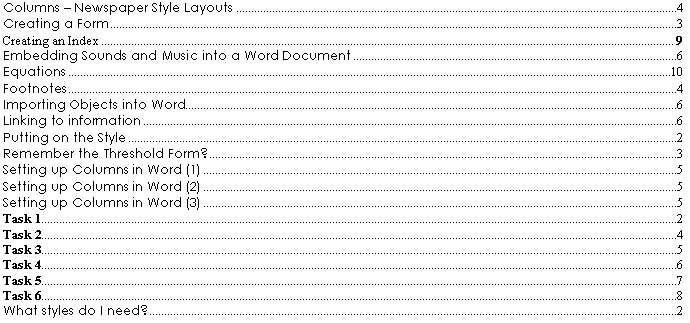
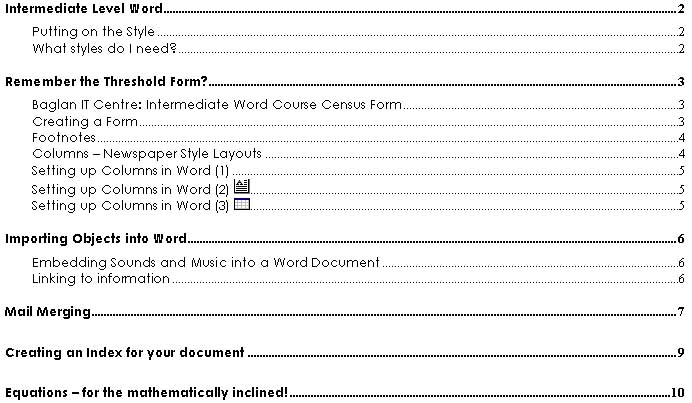
| Creating an Index for your document | |
| Here is the alphabetical index for this document as you would find in word: | |
|
|
 |
|
The key to creating an Index or Table of Contents (TOC) in a document is to mark the sections of text to be included, with Field Codes. These are invisible codes that normally do not appear in the document and are not printed. The easiest way of doing this is when a document is finished. In this particular document, I’ve decided to create an index based on the headings of each section and the pages containing tasks. Tip: make sure that your document is saved prior to creating an index page – just in case! Go to page one of your document and press the following key combination on the keyboard: Alt+Shift+X; this will display the Mark Index Entry dialogue box. Highlight the text in your document that will appear in the Index and click in the Main entry: area of the dialogue box: the highlighted text will appear there. Now select the Mark button to create the (invisible) field mark for the Index. This dialogue box will remain open on the screen for you to highlight, enter and Mark other Index entries. You can make the page references Bold or Italic (please don’t use both) by selecting the appropriate box. Note that after Marking the very first entry, your document appears to change dramatically. Don’t panic, this is only the document displaying all of the hidden field codes, including your newly created Index Entries! When you have finished Marking all the entries, click the close button in the dialogue box. If you want to hide the field codes, Select the Show/Hide button in the toolbar. Now go to the page where the index is to be created. This could be a new page at the end of the document, or an inserted page at the beginning. Add any text which you might need, for example a heading and make sure that the text cursor is on a new line of the page, ready for the Index. Select the Insert menu and Select the Index and Tables… entry. In the dialogue box, choose the tab for either an Index (shown above) or a Table of Contents (as on the next page). Select the options you would like from the choices before selecting OK. The Index above does not use a template whilst the Table of Contents on the next page uses the Simple template with dots for the leading and right aligned numbers. However, the biggest difference is that the Index enters the Marked Entries in alphabetical order, whilst the Table of Contents has created the entries in the order in which they were marked. One other advantage of a Table of Contents (which you may want to check out) is that the entries automatically become hyperlinks to those sections of the document. Select the section you want to go to by simply clicking the mouse! Note: For absolute control over your Index or Table of Contents, use the Heading styles for main and sub-headings throughtout your document. |
|
| A Table of Contents as distinct from an Index (shown previously) | |
 |
|
| What happens if I add to or remove information from the document – can I update the Index or TOC? Yes – simply mark up more sections (or delete sections) in the way outlined above, then click the right mouse button anywhere on the Index or TOC. Select Update Field! from the menu. |
|
| Equations – for the mathematically inclined! | |
If you need to include mathematical or scientific information in your document, there is a tool to help you enter maths/science symbols built into Word: the Equation Editor . Basically, this comprises a set of tools which allow you to enter a range of symbols and specify their placement, making it a lot easier creating simple symbols such as cubes, square roots, plus and minus signs etc. The equation editor toolbar is laid out in such a way that each button displays a range of tools when selected. Choose a suitable tool depending on the equation you need to create. The equation is created inside its own box, such that resizing it is simply a matter of dragging out any of the corner handles. Be aware of the cursor position when creating an equation as it can jump around depending on the tool you are using. As a general rule, look for a small black box on each tool, as this specifies where information will be entered into the equation. If you accidentally click the mouse with the pointer outside the equation area, Word will assume that you have finished entering the equation. To return to edit mode, double-click the equation. |
|