<%@LANGUAGE="VBSCRIPT" CODEPAGE="1252"%> :: BAGLAN IT CENTRE ::


Hints and Tips >>> Toshiba Data Projector
>>>>

1.
Press ON/STANDBY after using the projector.

An instruction message for turning the power off appears on the screen and disappears after a while. When the message disappears, operation becomes invalid.

2.
Press ON/STANDBY again.
Cooling starts. Once cooling is completed, the LAMP and FAN indicators turn off and the standby mode is set. (The ON indicator turns in orange.)

A.
To protect the light source lamp, the LAMP indicator blinks as long as a minimum of cooling is necessary. The power cannot be turned back on during this time. Unplugging the power cord at this time will shorten the lamp’s duration life.

B.
The cooling fan continues to run for a while to expel the heat remaining inside. If you are in a hurry, however, you may unplug the power cord at this time.

C.
The standby mode is set.

Notes

  • The projector consumes about 15W of power in the standby mode. We recommend you unplug the power cord when not using the projector for long periods of time.
  • Be sure that the LAMP indicator has turned off before unplugging the power cord. Cutting the power by unplugging the power cord while the projector is operating or the light source lamp is being cooled will shorten the lamp’s duration life. Should a fault or some other irregularity arise with this unit, unplug the power cord.
  • When reinserting the power plug before the lamp has cooled, please wait until the lamp has cooled sufficiently before use. When the lamp is at a high temperature, it may not light and it’s life duration will be shortened

The filter inside the air filter cover is the part to shut out dusts or dregs. Do not use the projector with the filter taken off. We recommend you clean the air filter frequently. (The cleaning period is once per 50 hours approximately).

1.
Unplug the power cord.

2
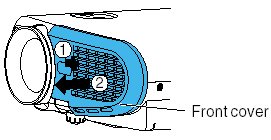
Take off the front cover.

Slide the front cover rightward side for about 3 mm, then the front cover can be taken off toward you.
3.
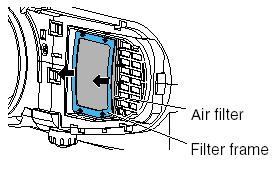
Detach the air filter.

Take off the filter frame by pulling the middle part of it toward you, then detach the air filter.
4.
Clean the air filter.

Use a vacuum cleaner to carefully remove any dust and dirt from the front cover, air filter and filter frame. Be careful that the air filter is not sucked into the vacuum cleaner.

CAUTION
If you use the projector mounted on the ceiling, ask the dealer to carry out the maintenance such as cleaning.

5.
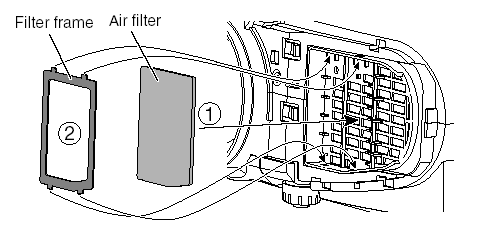
Mount the air filter and the filter frame.

Place the air filter in the projector, then insert the four tabs on the filter frame into the holes in the projector.
6.
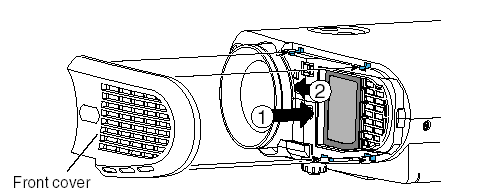
Mount the front cover.

Insert the hooks of the front cover into the projector first, then slide it to the lens side to fix it.
Notes

  • When the air filter is dusty, the ventilation is impaired. This causes the temperature inside the projector to rise, and may damage the unit.
  • Attach the air filter and the filter frame firmly after the cleaning. If it is not set correctly, the dusts will enter and they will be projected and overlapped on the picture.
  • If you wash the air filter with water, be sure to let it dry fully before reinstalling it. Using it damp will result in malfunction.
  • If the air filter is damaged, contact your store of purchase and replace it with a new one. Using a damaged air filter will cause dust or dirt to get inside the projector and onto the images.


The lamp will eventually begin to project dark or dull pictures and finally will not light up. (Lamp’s life depends on operating conditions.) In such a case, replace the lamp with new one.

1.
Unplug the power cord.

2.
Wait until the lamp gets cool enough.

3.
Take off the lamp cover on the bottom panel.
Loosen the two screws, and pull off the lamp cover.


4.
Pull out the lamp.
Loosen the two fixing screws, and lift up the handle to pull out the lamp

CAUTION

  • If you use the projector mounted on the ceiling, ask the dealer to carry out the maintenance such as cleaning or replacement of the lamp.
  • When replacing, always use lamp “TLPL55” (sold separately). For details, refer to the lamp instruction.
  • If you have been using the projector, the lamp will be very hot, and may cause burn injuries. Wait for the lamp to cool (for longer than 1 hour) before replacing it. If the lamp should break, please handle with care to avoid injury due to broken pieces and contact your dealer for repair service.


5.
Load a new lamp.

Slide until it hits the bottom and tighten the two fixing screws.

6.
Attach the lamp cover.

Slide the cover into place and tighten the two screws.

7.
Reset the lamp timer.

Refer to the lamp instructions for resetting.

Notes

  • When the CALL button is pressed, the “Lamp time” (the approximate amount of time the lamp has been used) will be displayed. 39
  • The lamp should be replaced if the total working time exceeds about 1,500 hours. When the “Lamp time” is displayed as 1500 hours, the icon and a message appear. They will disappear when you do some operation.
  • Attach the lamp cover firmly after replacing the lamp. If it is not set correctly, the power will not turn on.
  • Use a new lamp when replacing it.
  • The lamp is made of glass and is very fragile. Do not touch the lamp with your bare hands and do not jolt or damage it. Do not try to use an exhausted lamp.
  • A small amount of inorganic mercury harmful to environment is used for the lamp. Dispose of the exhausted lamp according to the rules of your area.

Baglan IT Centre · Elmwood Road · Baglan · Port Talbot
© 2003