Protecting
the Worksheet
When the Worksheet
is given to the pupils, it would be useful if they were allowed to only have
access to the cells in which they are to enter answers. Moreover, it wouldn't
take them long to realise that Selecting any of the check cells would display
the formulae (and therefore the correct answer) in the formula bar! Therefore,
you need to do two things - set cell protection for all cells except the answer
cells and hide the formula for the check cells.
Method
 Highlight
all the Check cells by dragging across them, then Select Format>Cells...
from the menu. Look at the tabs across the top of the dialogue and Select the
tab marked Protection. Note that there are two options here - Locked
and Hidden: Select both options. Now highlight all the other cells except
the Answer cells and Select Locked from the Format>Cells...Protection
menu. If you read the information at the bottom of the Protection dialogue box,
you will have noticed that protecting cells in this way will have no effect
unless the worksheet as a whole is protected. Finally, Select all the Answer
cells, Select the Format>Cells...Protection menu and de-select Locked.
 To
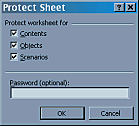
protect the worksheet, Select Tools>Protection>Protect Sheet...
from the menu. Select all three choices and (optionally) enter a password*.
Take care with your password because if you forget it, you will never be able
to unlock the worksheet! You have been warned! Note that if you choose
to use a password, you will be asked to re-enter it. Confirm that you cannot
edit the locked cells or view the formulae in the Check cells before
saving the file.
If you need to
edit any of the cells you have protected, you will need to unprotect
the worksheet. Select Tools>Protection>Unprotect Sheet... and enter
your password (if you set one). Don't forget to protect the sheet again after
editing, then save the file.
*If you protect
the worksheet without a password, it is a simple matter for anyone to
unprotect the worksheet at any time.
 Highlight
all the Check cells by dragging across them, then Select Format>Cells...
from the menu. Look at the tabs across the top of the dialogue and Select the
tab marked Protection. Note that there are two options here - Locked
and Hidden: Select both options. Now highlight all the other cells except
the Answer cells and Select Locked from the Format>Cells...Protection
menu. If you read the information at the bottom of the Protection dialogue box,
you will have noticed that protecting cells in this way will have no effect
unless the worksheet as a whole is protected. Finally, Select all the Answer
cells, Select the Format>Cells...Protection menu and de-select Locked.
 To
protect the worksheet, Select Tools>Protection>Protect Sheet...
from the menu. Select all three choices and (optionally) enter a password*.
Take care with your password because if you forget it, you will never be able
to unlock the worksheet! You have been warned! Note that if you choose
to use a password, you will be asked to re-enter it. Confirm that you cannot
edit the locked cells or view the formulae in the Check cells before
saving the file.