Auto
Content Wizard
As
with most Microsoft products, there is an Auto Content Wizard
to guide you through the process of creating a presentation by
giving a series of prompts. This is an alternative to creating
your own presentation form scratch.
In
the steps below, a sales presentation for a computer hardware
company will be created.

- Click
on File, then New. Select the Presentations tab, then double-click
on Auto Content Wizard.
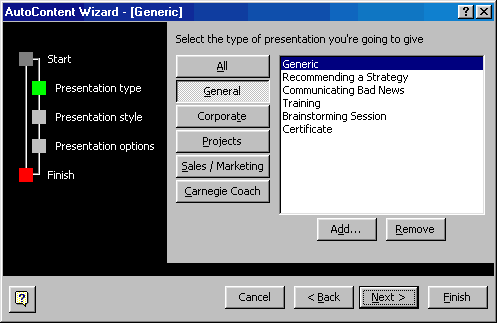
- When
the Auto Content Wizard appears click Next to display the illustration
above.
- The
list in the centre illustrates category headings as buttons
(All, General etc.) then illustrates the individual choices
on the right hand side (Generic, Recommending a Strategy etc).
The Flow Chart on the left shows your progress through the Wizard.
Clicking on a different button in the centre (eg General or
Corporate) will alter the choices that appear in the right-hand
window. For example, clicking on the Personal Button offers
only two choices - Personal Home Page and Announcement/Flyer.
Once you have selected the type of wizard you want to use, click
the Next button.
- The
next screen gives a variety of output choices - Presentations,
Informal Meeting and Handouts or Internet/Kiosk. As an example,
select Presentations, Informal Meeting and Handouts. Click Next.
- Select
On screen presentation, and Yes to the question 'Will you print
handouts'. Click Next.
- The
next screen is a placeholding slide, which allows you to enter
text into the specified location.
- Type
in the information you wish to appear - the title and name of
the slide.
- Click
Next and, on the next slide that appears, click Finish.
The
Wizard then takes you into the slide show you have created, and
displays it onscreen using Outline View. Congratulations, you
have now completed your demonstration presentation. The techniques
you have used are identical to those involved with creating a
slide show manually using new slides. Please save as PowerPoint
Example 1.
 Contents:
Presentations Contents:
Presentations
 Skill
Check: Presentations Skill
Check: Presentations
|


