Creating
a Slide Show - Layout Elements
The
design brief is for a computerised slide show, devised around
a series of competency-based qualifications, with the following
considerations:
| The
Target Audience |
General
public passing a window or an exhibition stand at a College
Event but which also can be easily amended for use at a formal
College event. |
| The
Intention |
Give
information about the CIT Scheme in order to attract the public
to consider enrolling on the course. |
| Image
and Style |
An
upbeat and colourful presentation outlining the modular aspect
of the course and range of modules. No more than eight slides
using simple charts, large text and clip art images suitable
for a short duration rolling display. |
| Purpose
of Presentation |
An
overview with limited information. More detailed audience
handouts only for formal College events. |
| Format |
Computer
screen. |
The
slide show needs to:
- Identify
the College and Faculty
- Identify
the Course
- Identify
the modules and packages
- List
important points about the Course
- Emphasise
the certificates to be gained
- Show
the popularity of the modules and the recent pass rates
In
response to this brief the following show has been produced:
Slide
1: The College Title Slide
- Launch
Powerpoint and select the Auto Content Wizard. Choose On-screen
Presentation.
- A
suitable background is needed for the slide show. Click on More.
Scroll down to 'embossed'. Click Next.
- Click
on all the options except Full-page slides. Click Next and then
Finish. Note that no speaker's notes and audience handouts are
needed in this presentation.. Type in "Swansea College"'
as title and "IT Workshop" as sub-title.
- Drag
title to the top of the slide and sub-title below the second
line of the background file.
- Click
the Insert menu and select Picture. Pick a clip art symbol to
insert - the picture will need to be cropped. Click the Tools
menu and select Crop Picture for the cropping tool to crop the
right and bottom sides.
- Click
on the logo and drag to the required position as shown below.
Please note that he background featured in the illustrated slides
is not available on PowerPoint 97. Please select any of the
currently available backgrounds.
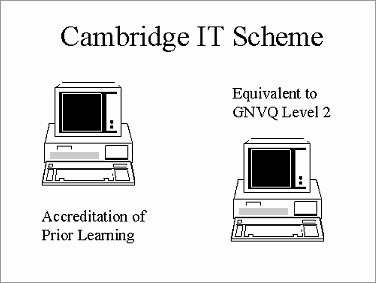
Slide
2: The CIT Slide
- Click
on the Insert menu and select New Slide. Choose the Title slide
option. Type in "Cambridge IT Scheme" as the title
and "A Competency-based Approach" as sub-title.
- Drag
the title to the top of the slide and the sub-title below the
second line of the background.
- Click
the Insert menu and select Picture then Clipart. Double-click
to import a suitable image. Size the image for the left-hand
image as shown below. Select the image, copy and paste the same
image on the right-hand side.
- Select
the sub-title placeholder, copy and paste it. Select the copy
and replace the text inside it with "Equivalent to GNVQ
level 2".
- Create
another text box. Replace the text inside it with "Accreditation
of prior learning". Place the text boxes as illustrated
below.
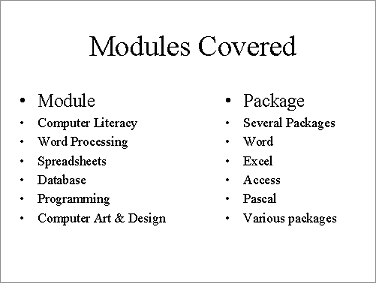
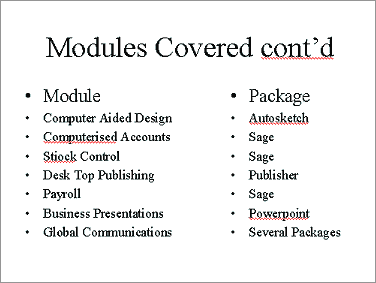
Slides
3 and 4: The 'Modules Covered' Bullet Charts
- Click
the Insert menu and select New Slide, choosing the Two Column
Text template. Type in "Modules covered" as the title.
Type in the text as shown in the illustration below.
- Select
the title placeholder rectangle by clicking on it's border.
From the Edit menu select Copy and then Paste to make a copy.
- On
completion of slide 3, go to Edit and Select All. Selection
boxes will appear around all the text. Go to Edit, then Copy.
- Click
at the end of the slide. Go to Insert and select New Slide.
Choose the Blank slide.
- Click
Edit, then Paste. Modify the new slide as shown on the second
slide below. Give the sub-title shadow by clicking on Shadow
on/off on the Frame Drawing toolbar.
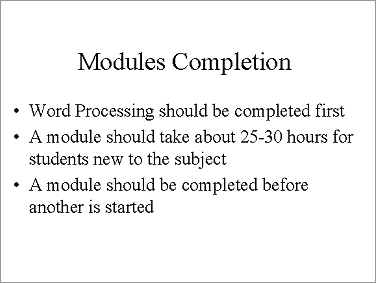
Slide
5: Modules Completion
- Insert
a New Slide as before and choose the Bulleted List template.
- Type
in "Modules Completion" as the title.
- Type
in the text as shown below and leave the text editor.
Slide 6: The Certificates
- Insert
a New Slide and choose the Text and Clip Art template.
- Click
in the title and text placeholders in turn and key in the required
text as shown below. Use any suitable certificate clip art.
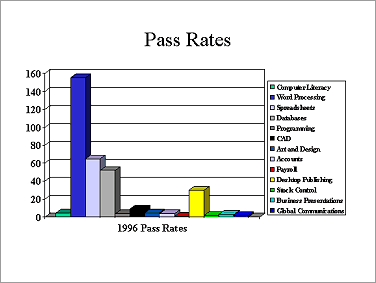
Slide 7: The Results Graph
- Insert
a New Slide and select the Chart template.
- Click
the title placeholders and type in the required text as shown
below.
- Double-click
on graph placeholder and the Datasheet table will appear. Select
columns B, C and D and delete.
- Amend
column A header from "1st Quarter" to "1996 Pass
Rates". Replace row headings (East, etc.) and cell values
with the following information. Extra rows will need to be added.
| Computer
Literacy |
5 |
|
Accounts |
4 |
| Word
Processing |
155 |
|
Payroll |
1 |
| Spreadsheet |
65 |
|
Desk
Top Publishing |
30 |
| Database |
52 |
|
Stock
Control |
2 |
| Programming |
4 |
|
Business
Presentations |
3 |
| CAD |
9 |
|
Global
Communications |
2 |
| Art
and Design |
5 |
|
|
|
Click
on the graph to see the columns displayed. The default text size
of 18pt is too large. Select the Chart frame and click the right-hand
mouse button. Choose Edit Graph Object. Select the Legend frame
and click the right-hand mouse button. In the dialog box choose
the Font tab and change the font size to 14pt. Your slide should
look like this:
 Contents:
Presentations Contents:
Presentations
Skill
Check: Presentations
|